How it works
How is the terrain drawn?
How OPFRAME finds, picks, loads and draws the map tiles behind its terrain, from a tile's address on disk to the shading on screen.
Project: OPFRAME · Oct 2026
The ground in OPFRAME is built out of map tiles. Imagery gives it its colour and elevation gives it its shape. Getting those tiles onto the screen happens in four stages. First, every tile needs an address so it can be found. Then, every frame, the renderer selects the tiles the camera needs, at the level of detail it needs them. Those tiles are streamed in the background and kept on the GPU, and finally they’re drawn: each one gets a mesh, and the ground is shaded. The rest of this page goes through the stages in that order.
Address
Tile addressing
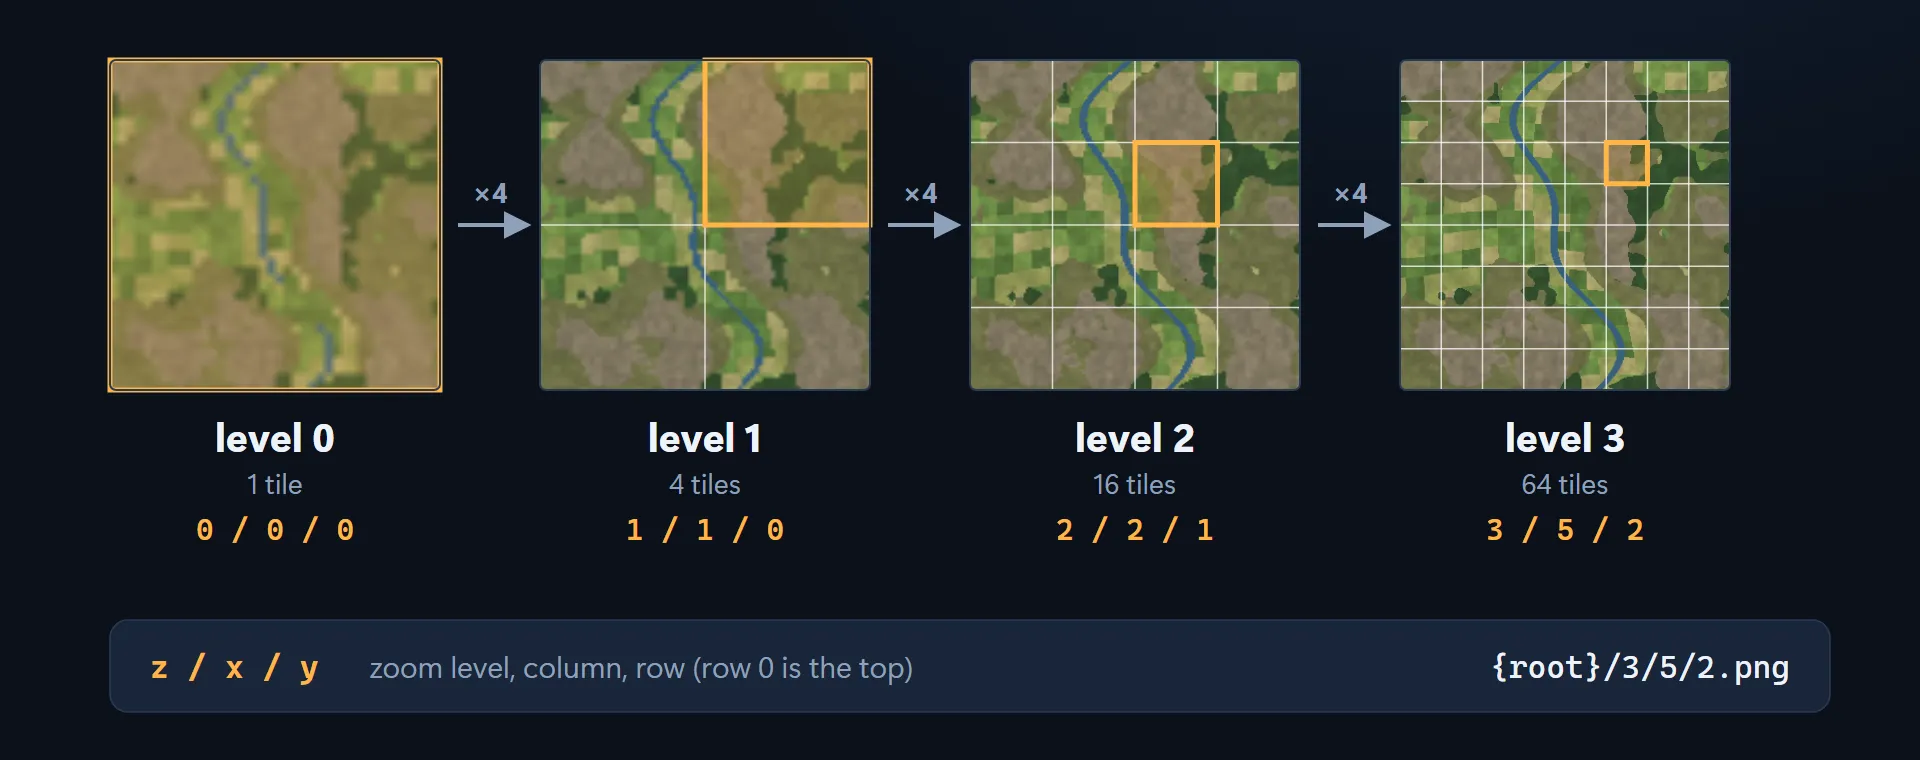
Imagery and elevation both use the same Web Mercator XYZ tiles. Level 0 is a single tile, and each level after that splits every tile into four, so there are 4 tiles at level 1, 16 at level 2 and 64 at level 3.
A tile’s address is three numbers, z / x / y, which are the zoom level, the column and the row (row
0 is at the top). The address doubles as the tile’s location on disk, so tile 3 / 5 / 2 lives at
{root}/3/5/2.png.
Layered data
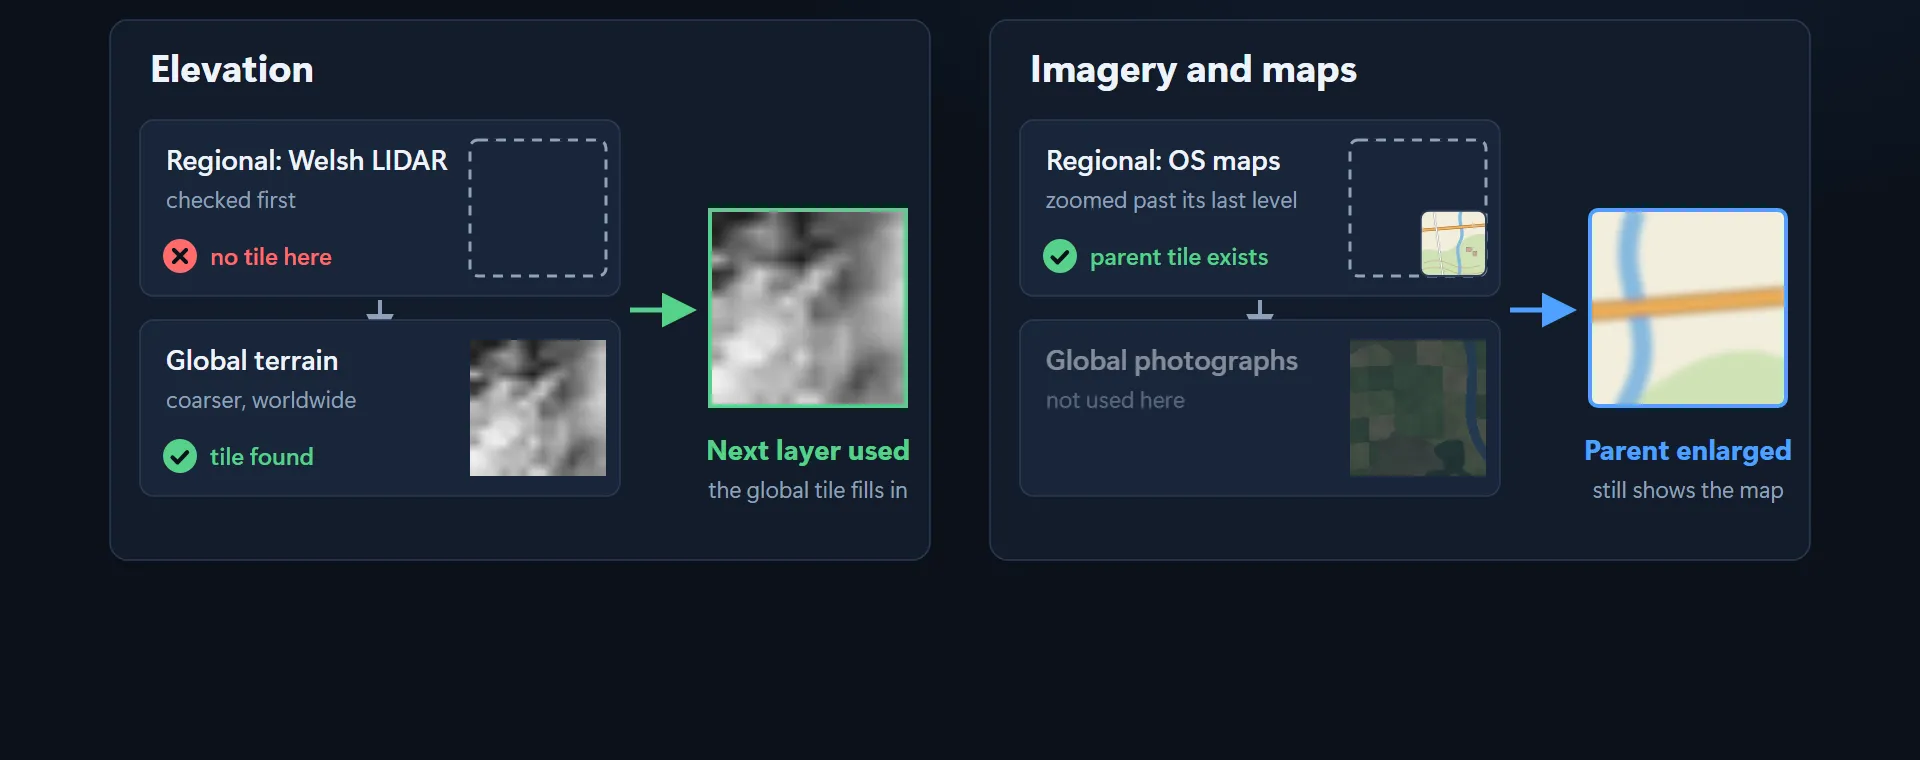
A detailed regional dataset can sit on top of a coarser global one. When the detailed layer has nothing for a particular spot, elevation and imagery deal with the gap in different ways.
For elevation, the regional layer is checked first (Welsh LIDAR, in the example below). If it doesn’t have a tile there, the next layer down is used instead, and the global terrain fills the gap. It’s coarser, but it covers the whole world.
Imagery and maps work differently. Once the camera zooms in past the regional layer’s last level (OS maps, in the example), the parent tile from that last level is enlarged. The global photographs underneath aren’t used, so the map still looks like a map.
Elevation tiles
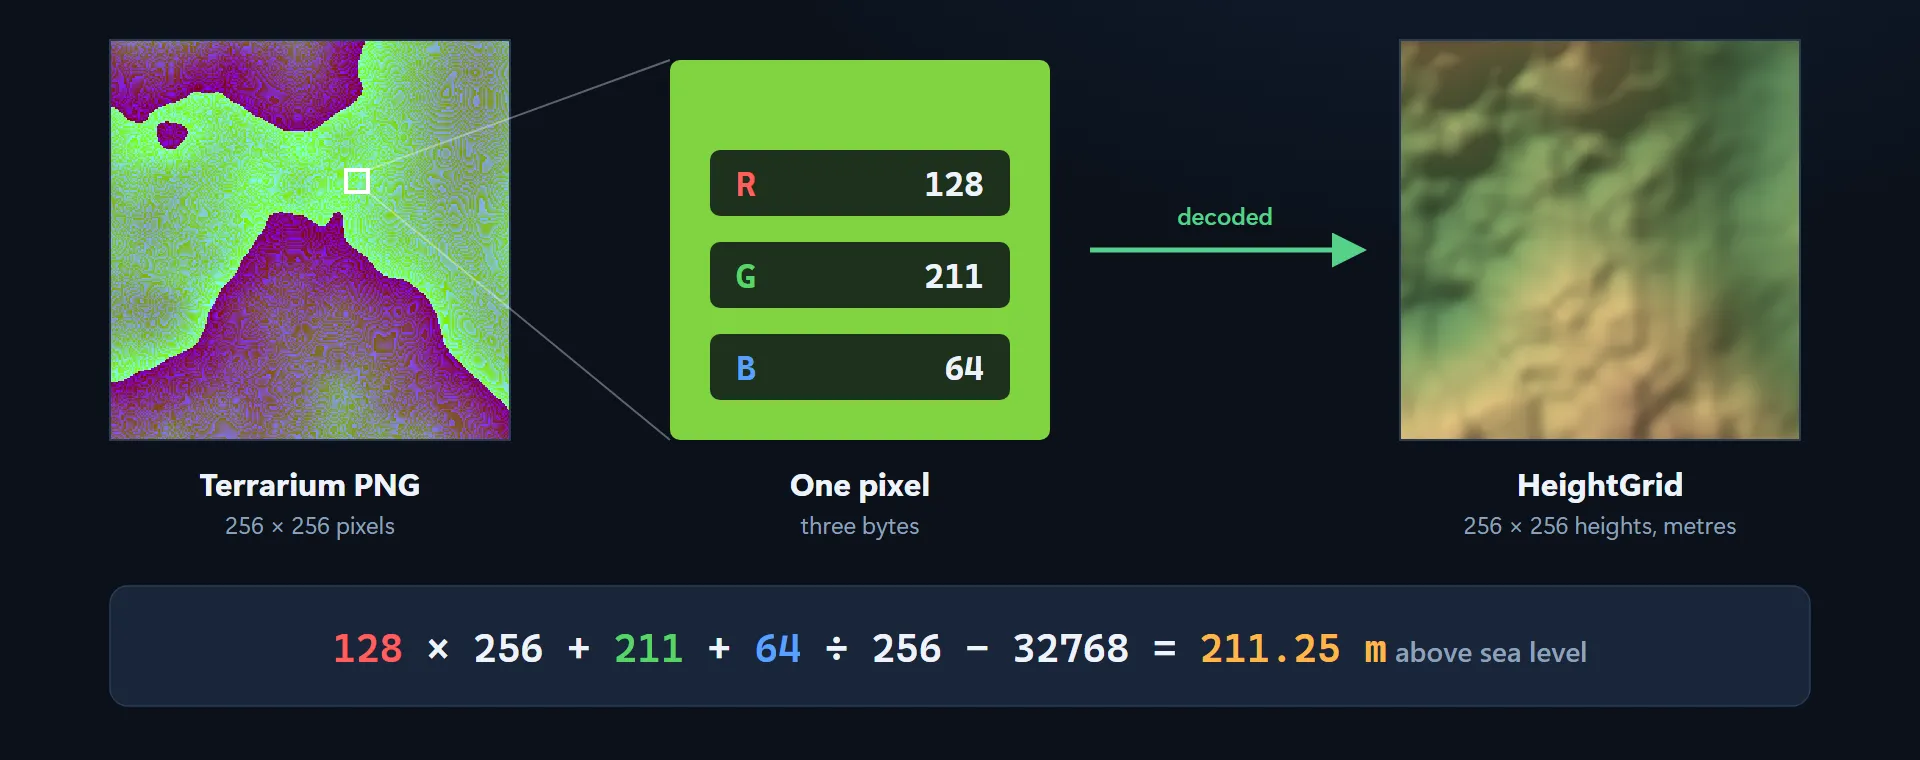
Heights are stored as 256 × 256 Terrarium PNGs, with each height split across a pixel’s red, green and blue bytes. Decoding a tile gives you a HeightGrid of 256 × 256 heights in metres.
height = red × 256 + green + blue ÷ 256 − 32768For example, a pixel with red 128, green 211 and blue 64 works out as 128 × 256 + 211 + 64 ÷ 256 − 32768 = 211.25 m above sea level.
Select
Choosing tiles
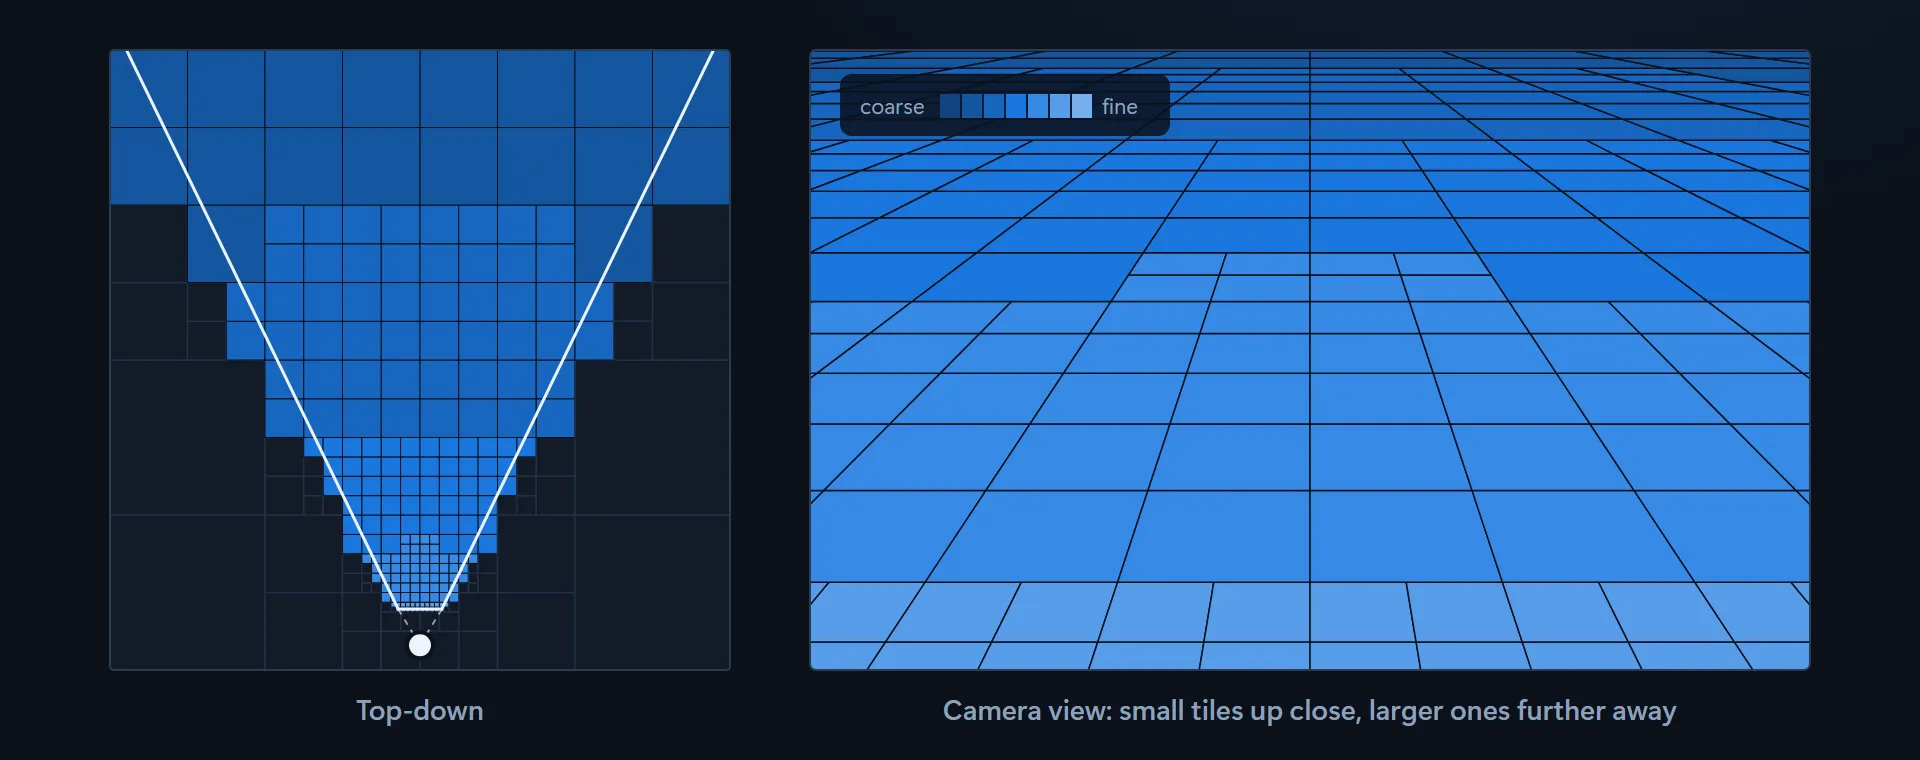
Every frame, a tile is split into four if its texels would cover more than one screen pixel, and the same test is then run on each of the four. Ground close to the camera takes up more of the screen, so tiles there get split over and over and end up small. Further away, bigger tiles are already detailed enough.
Culling and prefetch
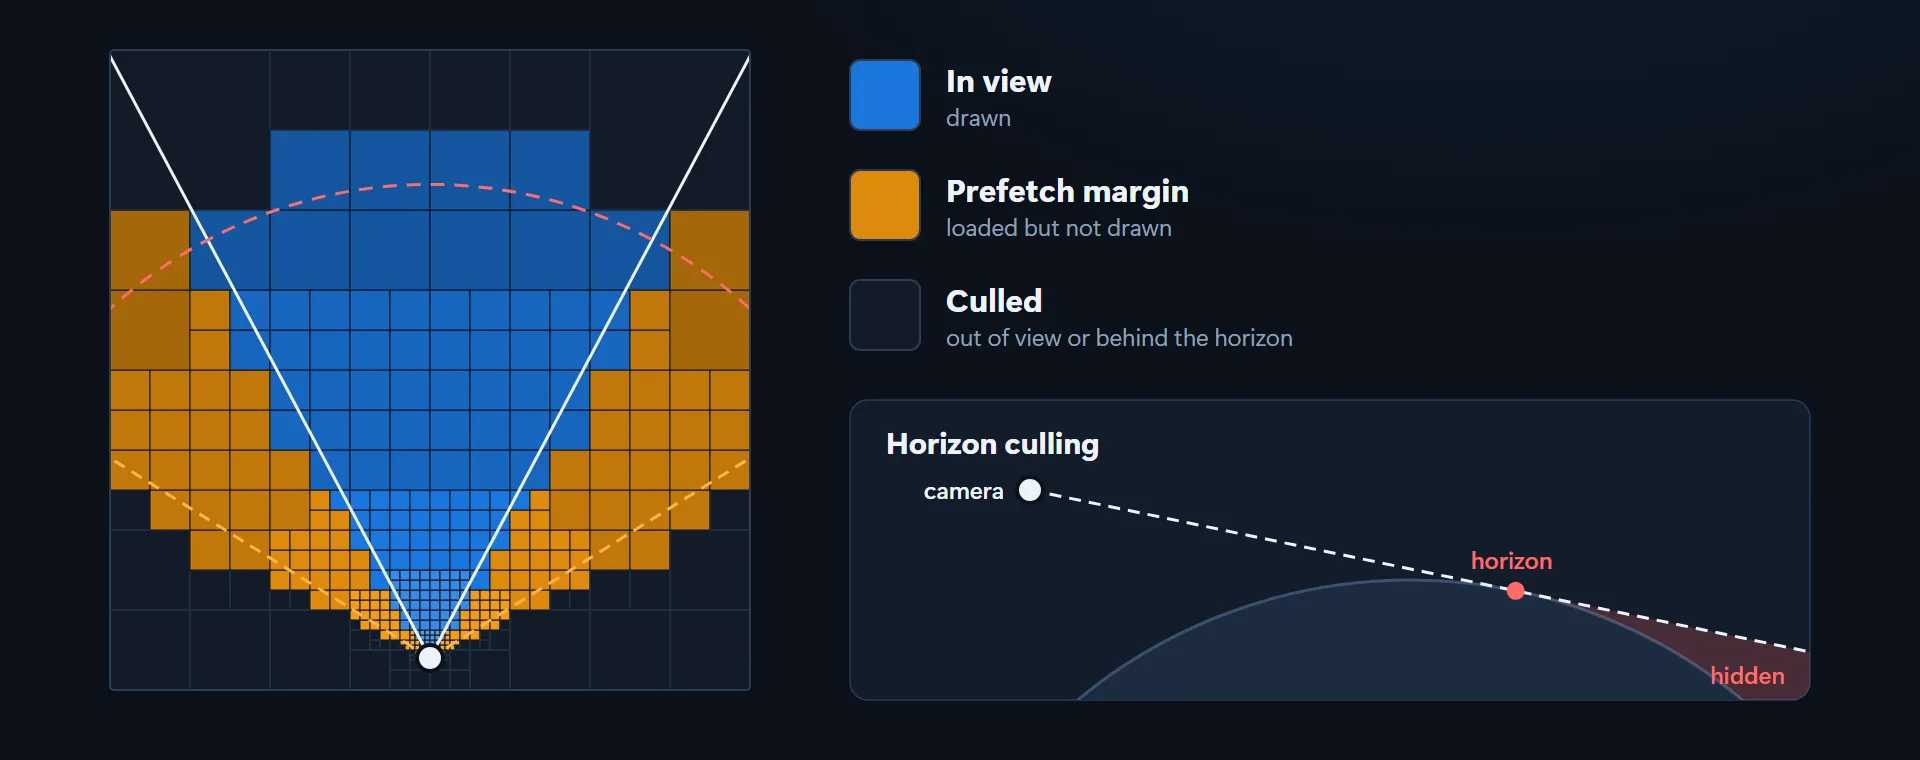
Tiles that are out of view are skipped (culled) and never drawn. A tile counts as out of view if it’s outside the camera’s field of view, or if it’s behind the horizon, where the line of sight has already skimmed past the curve of the Earth and the ground beyond is hidden.
A margin around the view is loaded in advance but not drawn. That way the tiles are already there when the camera turns.
Stream
Background loading
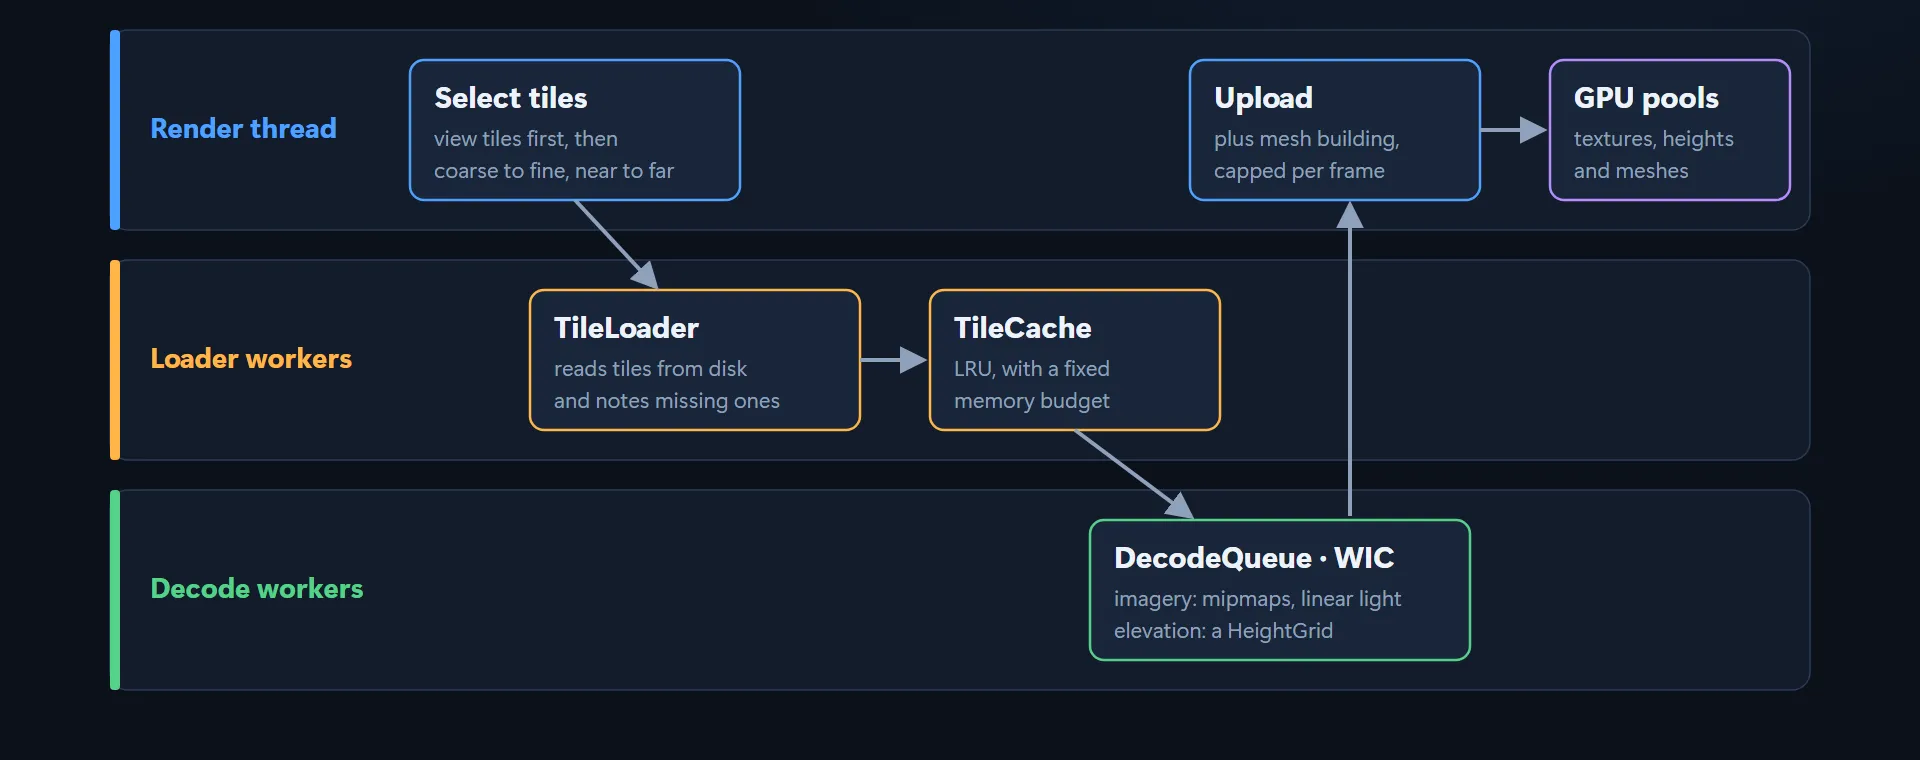
Reading from disk and decoding images both happen on worker threads, so the render thread never has to wait for them. On its way to the GPU, a tile passes through three kinds of thread.
It starts on the render thread, which selects the tiles it wants. They’re listed with the tiles in view first, then from coarse to fine and from near to far.
Next come the loader workers. The TileLoader reads tiles from disk and keeps a note of any that are missing, and the TileCache holds on to what’s been read within a fixed memory budget, throwing out the least recently used tiles first.
After that, the decode workers take over. The DecodeQueue decodes each image with WIC, the Windows Imaging Component. Imagery gets its mipmaps, in linear light, and elevation becomes a HeightGrid.
Finally the tile is back on the render thread, which uploads the finished results into the GPU pools for textures, heights and meshes. Mesh building happens here too, and the work is capped per frame.
GPU memory
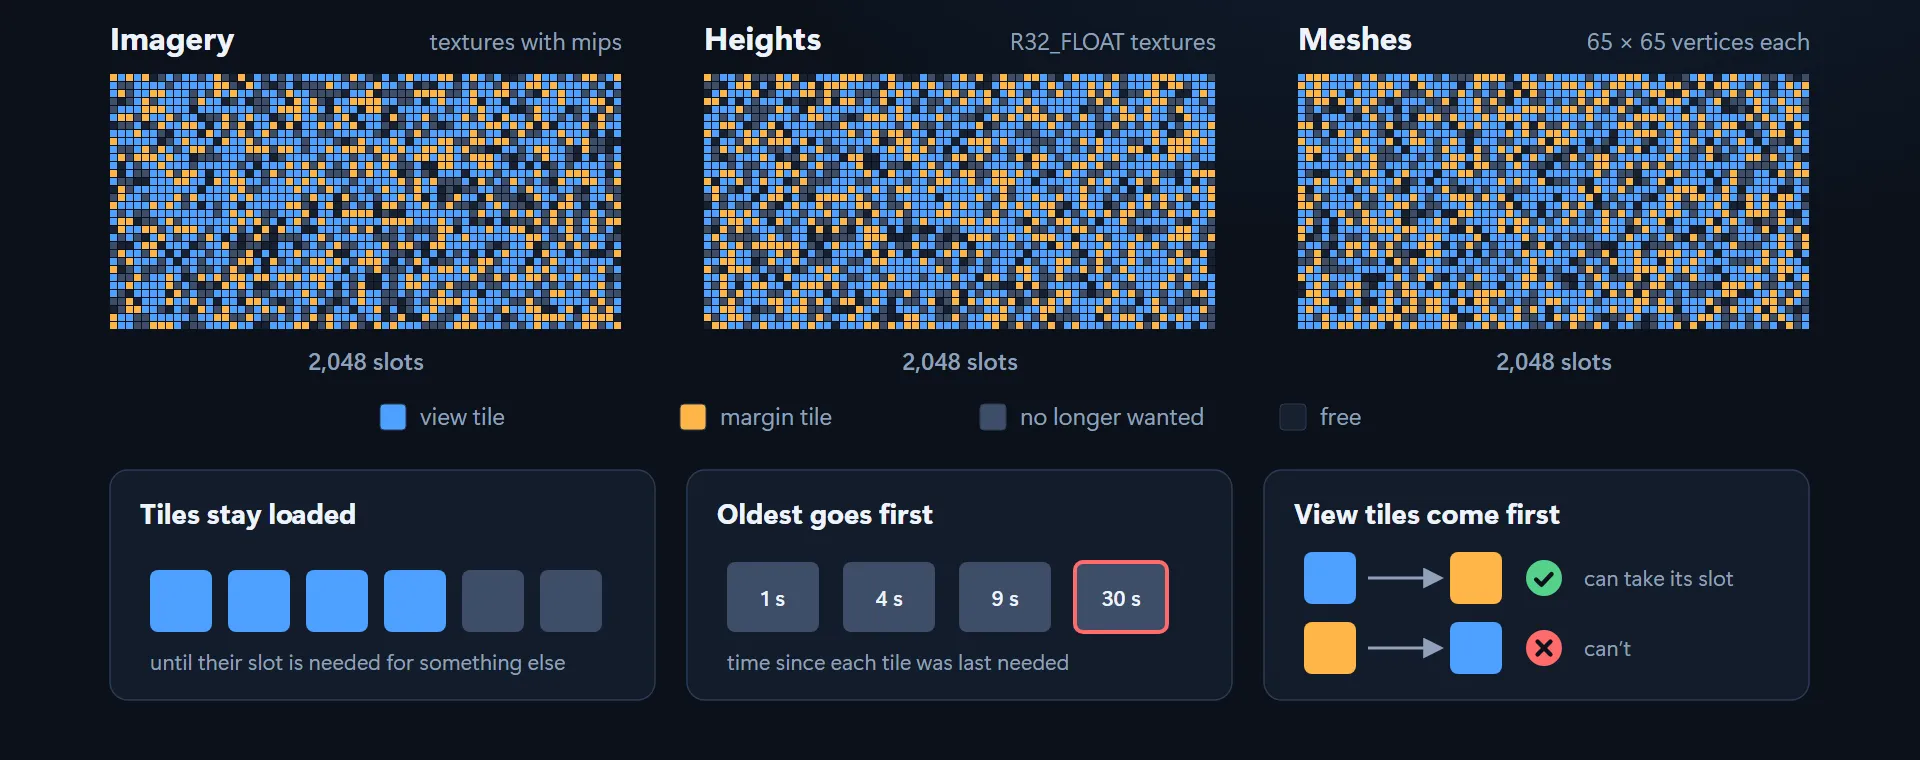
Imagery, heights and meshes each get a pool of 2,048 slots on the GPU. Imagery is held as textures with
mips, heights as R32_FLOAT textures, and each mesh has 65 × 65 vertices. At any moment, a slot holds
a tile that’s in view, a margin tile, a tile that’s no longer wanted, or nothing at all.
Three rules decide which slot a tile gets. Tiles stay loaded until their slot is needed for something else, so if you turn back to the same ground, its tiles are still there. When a slot is needed, the oldest goes first, meaning the tile that was needed least recently. And tiles in view always win: a tile in view can take a margin tile’s slot, but a margin tile can never take a slot from a tile in view.
While a tile loads
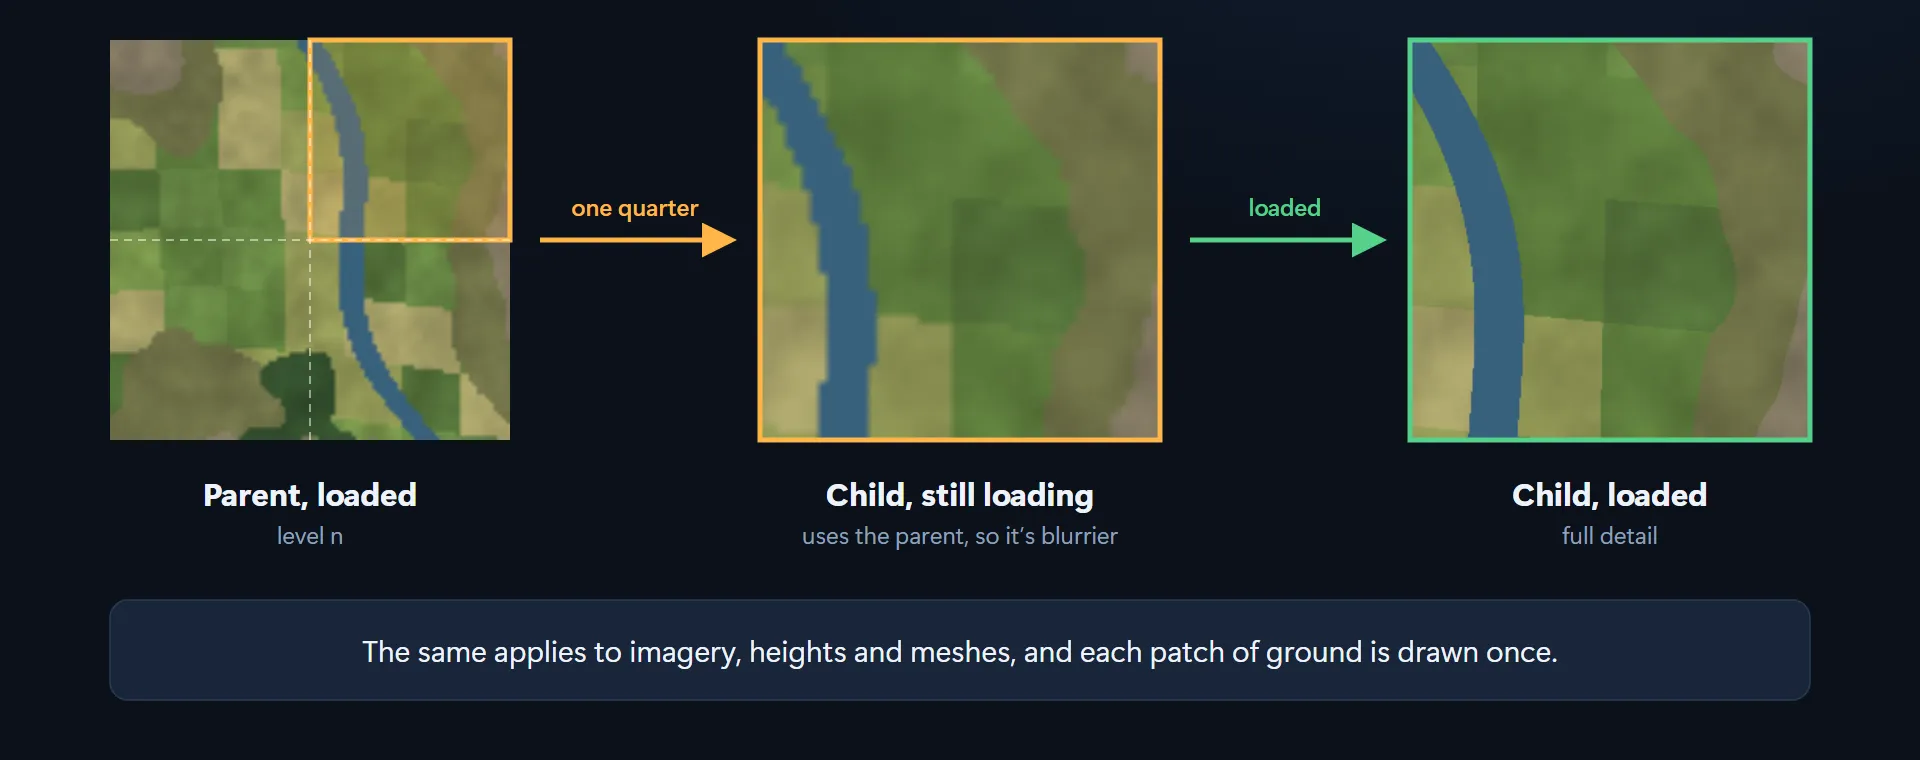
Until its own data arrives, a tile is drawn using the matching part of the nearest loaded tile above it. If its parent is loaded, it borrows the right quarter of the parent, enlarged and so a bit blurrier, and switches to its own full detail once that has loaded.
This works the same way for imagery, heights and meshes, and each patch of ground is only ever drawn once. You don’t get holes while tiles are loading, and you don’t get overlaps either.
Draw
Tile meshes
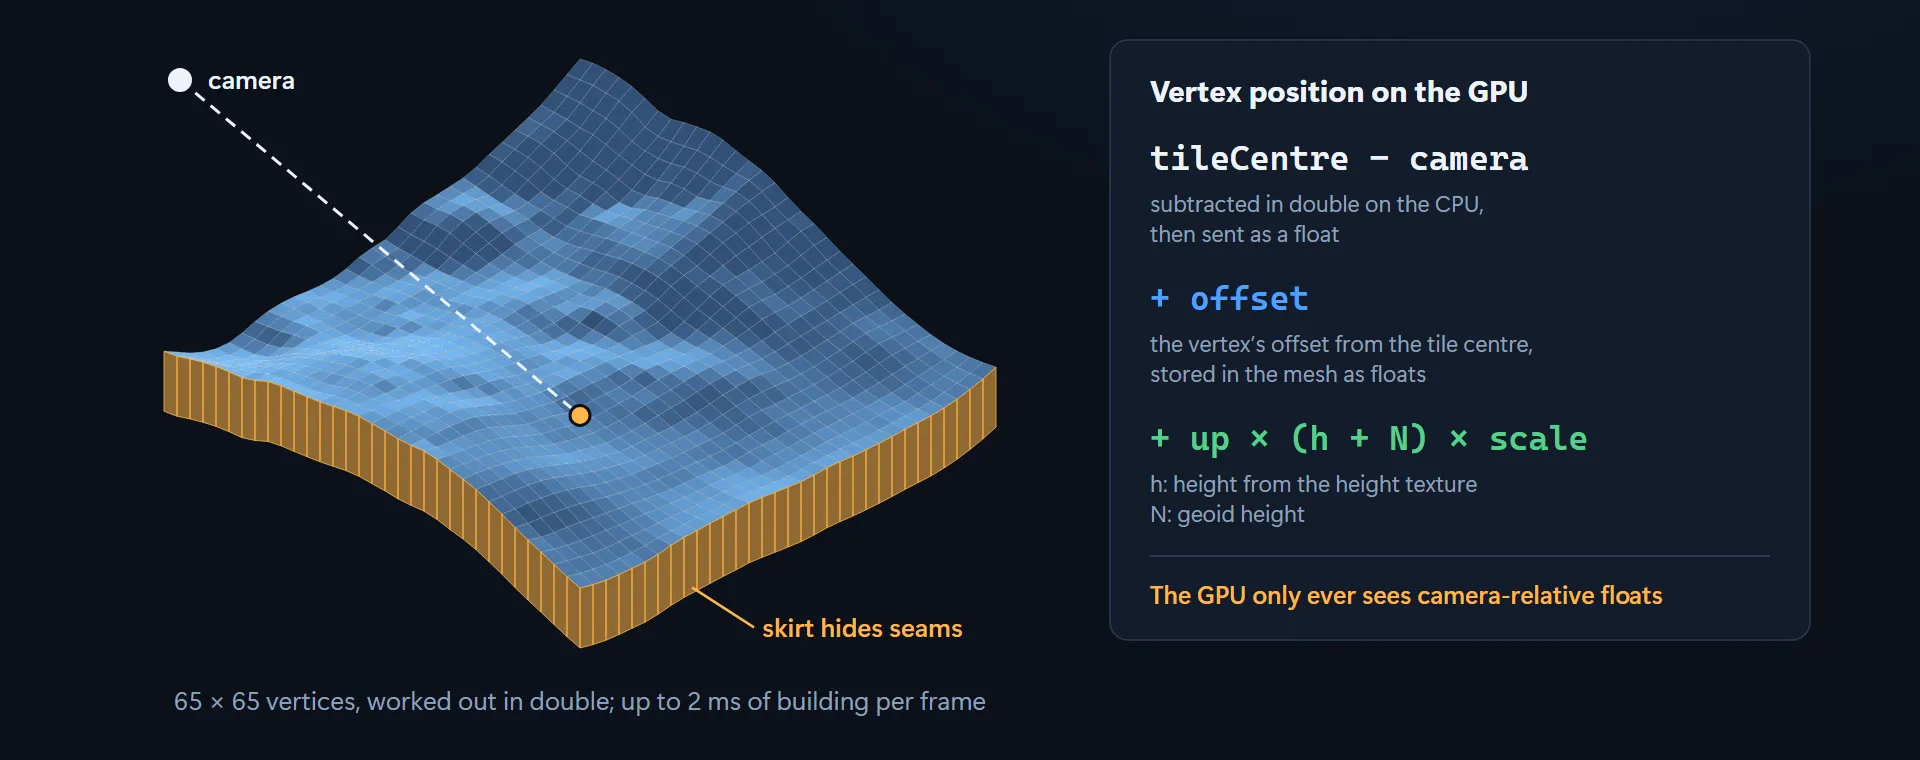
Each tile is a grid of 65 × 65 vertices, positioned relative to the camera, which keeps it precise anywhere on the globe. The positions are worked out in double precision, and up to 2 ms per frame can go on building meshes. On the GPU, a vertex’s position comes out as:
(tileCentre − camera) + offset + up × (h + N) × scaletileCentre − camera is subtracted in double precision on the CPU, then sent across as a float.
offset is the vertex’s offset from the centre of the tile, stored in the mesh as floats. h is the
height from the height texture, and N is the geoid height.
The GPU only ever sees camera-relative floats. A float holds only about seven significant digits, which is plenty for a distance from the camera but nowhere near enough for a position on a whole planet. Each tile also has a skirt hanging down from its edges, to hide the seams where neighbouring tiles meet.
Terrain shading
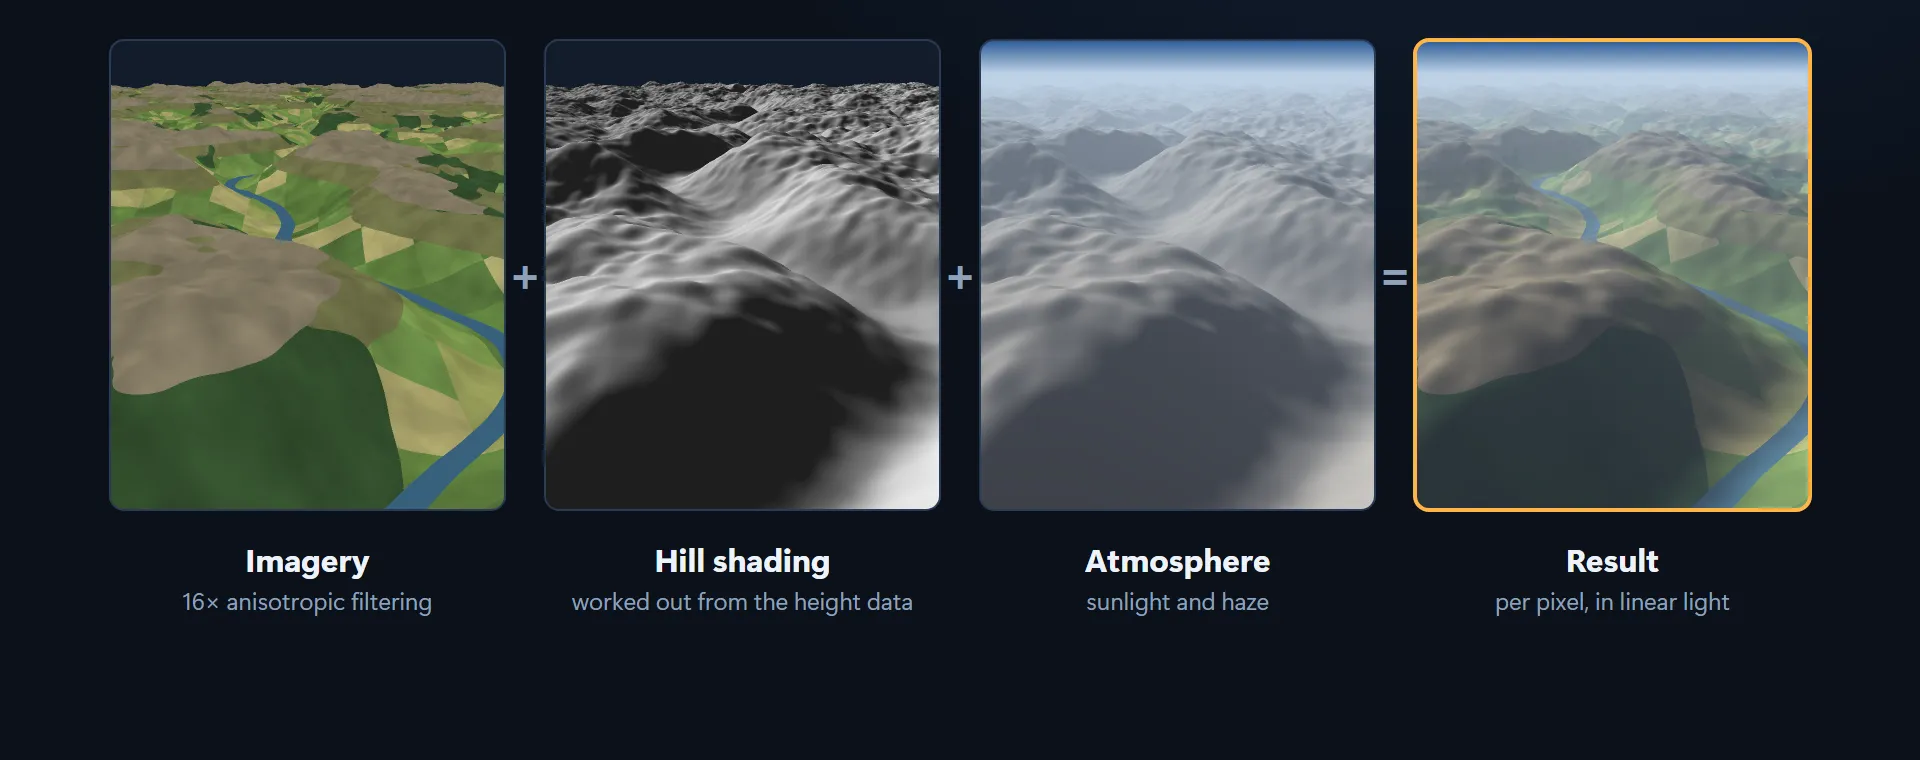
The terrain pixel shader combines three things for every pixel, working in linear light: the imagery, sampled with 16× anisotropic filtering, the hill shading worked out from the height data, and the sunlight and haze of the atmosphere.
2D and 3D views
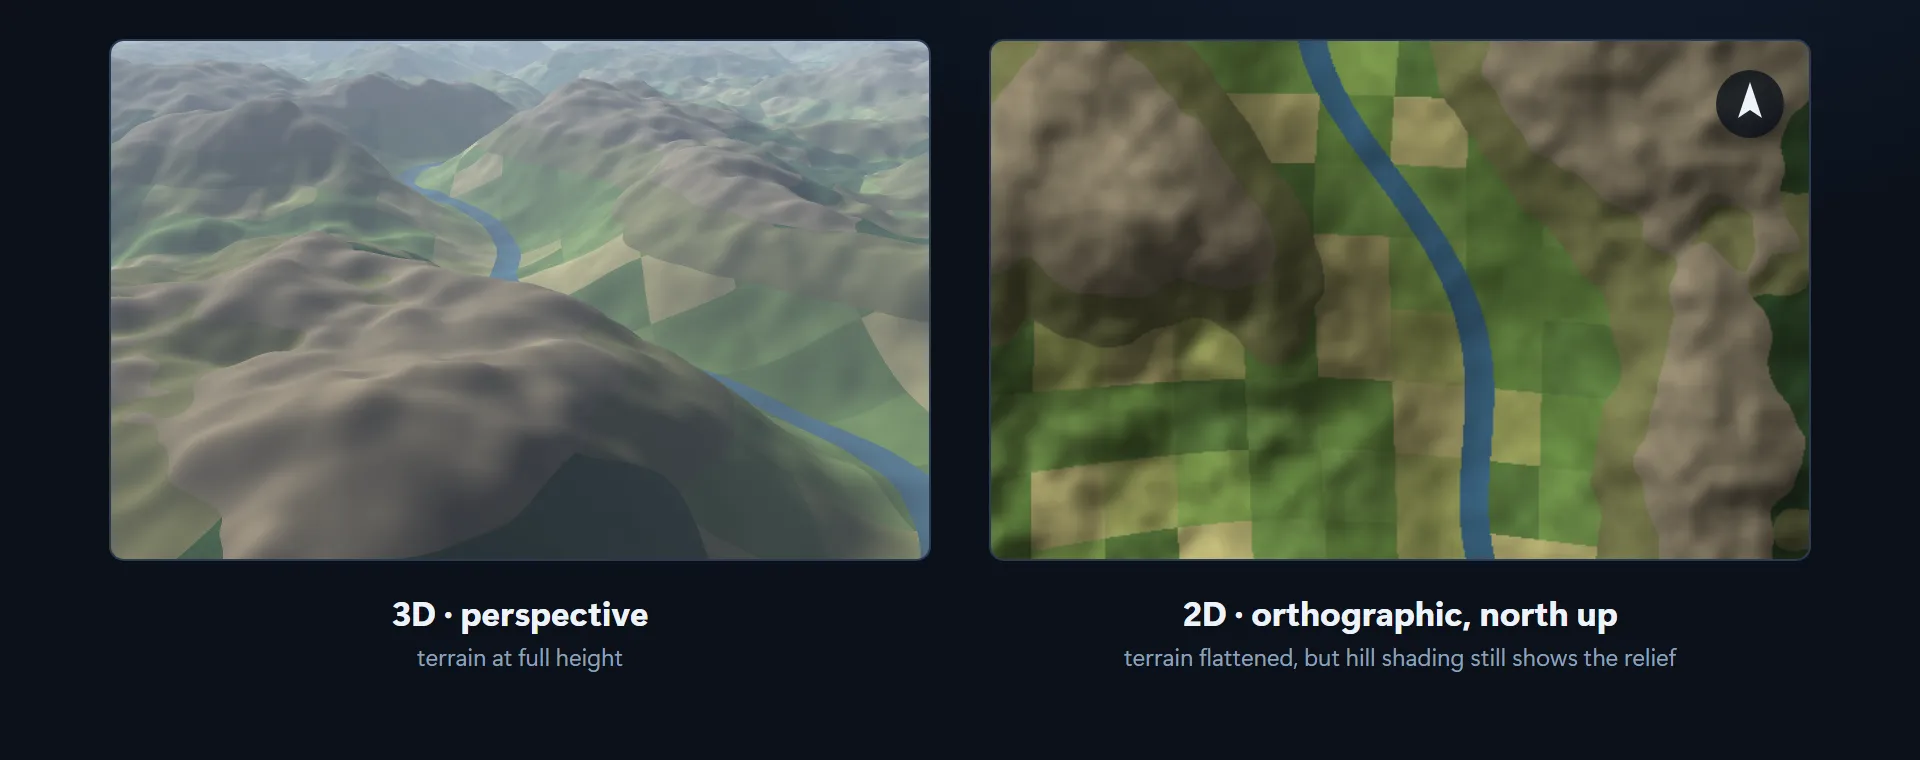
Both views use the same tiles, cache and shaders. The 3D view has a perspective camera and the terrain at full height. In 2D, the camera looks straight down with an orthographic projection and north at the top. The terrain is flattened and there’s no haze, but the hill shading still shows the shape of the land.